Measuring hardness is a simple yet powerful test to ensure proper curing and evaluate the performance of adhesive materials.
The hardness scales for epoxy and silicone formulations range from rigid to flexible. Commonly used hardness scales are A and D. Shore A is used for softer materials, whereas Shore D is used for harder materials. To better understand these scales, a rubber band measures at a hardness of around 30 Shore A, whereas a hard hat measures at a hardness of about 80 Shore D. There is some overlap in these two scales, as tire treads have a hardness of approximately 70 Shore A, which is equivalent to 15 Shore D.
Why is Hardness Testing Important?
Hardness is generally a good indication of the product’s overall functionality. When the end user receives the adhesive (be it a one component, two component, or UV cure), the adhesive should be cured by itself first (You can learn more about how to start using a new material here: https://www.masterbond.com/techtips/how-start-using-new-epoxy-bonding-application.) In this case, the end user can see exactly how the material cures and check if the hardness is in the range mentioned on the technical data sheet. If the mix ratio used was incorrect or if parts A & B were not mixed thoroughly or properly, the adhesive will cure “tacky” or with blotches. Thorough mixing of parts A & B can be more difficult when both are the same color. In this case, hardness testing is even more important to ensure that the product has been measured, mixed, and cured properly.
Adhesive Sample and Equipment for Hardness Testing
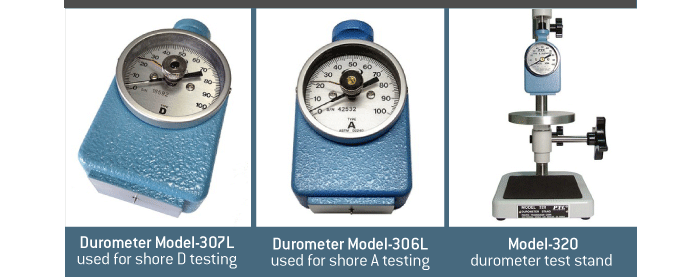
Master Bond hardness testing is based on ASTM D 2240 standards and requires a durometer, durometer stand and a fully cured test sample (at least 1/8" thick). Below are the models used by Master Bond.

How to Perform Hardness Testing for an Adhesive
To test an adhesive, prepare a cured sample. For a two component system, first mix parts A and B of the material, apply it as a casting, and cure it, preferably in an oven for an accelerated cure. One part systems (either heat activated or UV cured) are easier to test, since they don’t require mixing. Then, the cured sample can be tested in the method described below to determine the hardness of the adhesive.
To perform the hardness test, place the adhesive sample on the table (i.e. flat surface) beneath the indentor point. Make sure the red ancillary hand on the durometer is lined up with the “0” by turning the center knob to align. In one continuous fluid motion, turn the lever on the right in a clockwise direction until the indentor point is pressed into the sample and stops moving. Record the value. This procedure is repeated a few times on one side by moving the sample piece to a new spot. The sample should then be turned over and repeated a few more times. Finally, average the readings to arrive at the hardness figure.
Hardness as a Measure of Performance Properties
Hardness can also be used to determine how a material is holding up to various experiments and accelerated aging tests. For example, 85°C + 85% humidity testing is often used to determine the expected operating life for devices stored in damp heat. Master Bond performed this testing on many adhesives and potting compounds by subjecting the cured samples directly to 85°C + 85% humidity, for 1000 hours. If the hardness measure remained at the same level before and after the exposure, the adhesive was not impacted. It could therefore be concluded that the Master Bond adhesive performed favorably.
Another example is chemical resistance testing. Cured samples are immersed in various chemicals for a prolonged time period. The hardness is periodically measured. Again, if there is little to no change in the hardness measurements, it can be concluded that the adhesive performed well and was not impacted by the chemical exposure.
